The correct installation of the Pneumatic Solenoid Valve
1. When receiving the goods, please check whether the model and parameters on the solenoid valve nameplate or label are consistent with those proposed at the time of ordering. If there are any errors, please get in touch with the supplier immediately.
2. Before installation, please read the user manual carefully and check whether the actual working condition parameters on site are within the application range of the product you have purchased. If the on-site working condition parameters exceed the allowable range, please stop installation or use immediately and consult us to avoid accidents or damage to the product.
3. Follow the installation operation steps strictly, remember the precautions and key points, and make full preparations before installation.
4. Before installing and connecting the solenoid valve to the pipeline, first flush the pipeline with air or water at a pressure of ≥0.3MPa to ensure that impurities in the pipeline (such as welding slag, seal residue, dirt, etc.) are removed, and then connect the solenoid valve.
5. Solenoid valves should not be installed in the low-lying areas of pipelines. If they are installed in the container discharge pipeline section, the pipeline outlet should not be led out from the bottom of the container as much as possible to prevent impurities deposited at the bottom of the container from flowing out and entering the solenoid valve, causing malfunctions. Therefore, the pipeline outlet should be led out slightly above the bottom of the container.
6. Generally, solenoid valves can only be used IN one direction and must not be installed in reverse. Usually, there is a "" mark on the valve body indicating the direction of the medium flow, or the English letters" In "represent the inlet and" OUT "represent the outlet. Please install them strictly in this indicated direction; otherwise, when the fluid reaches the solenoid valve, it may automatically open or leak.
7. When taking over the pipe, be careful not to use excessive sealing material. For example, when connecting by thread, the length of the external thread of the pipe should not exceed the effective length of the internal thread of the solenoid valve. Use a file to bevel the half pitch at the front end of the external thread, and start winding the sealing tape from the second thread. Otherwise, excessive sealing tape or adhesive residue entering the inner cavity of the solenoid valve may cause a malfunction.
8. Requirements for the fluid of the solenoid valve: It should be ensured that the fluid is free of impurities, does not crystallize, does not solidify, does not scale, does not paste, and the viscosity is less than 22CST; otherwise, it may cause malfunctions. At the same time, a filter should be installed on the front pipeline of the solenoid valve, and the mesh size of the filter should be ≥60 mesh to prevent impurities from entering the solenoid valve.
9. Please pay attention to the protection level of the product you order. The ordinary type should not be used in flammable and explosive hazardous environments. The IP54 grade should not be installed outdoors or in places with severe water leakage or splashing.
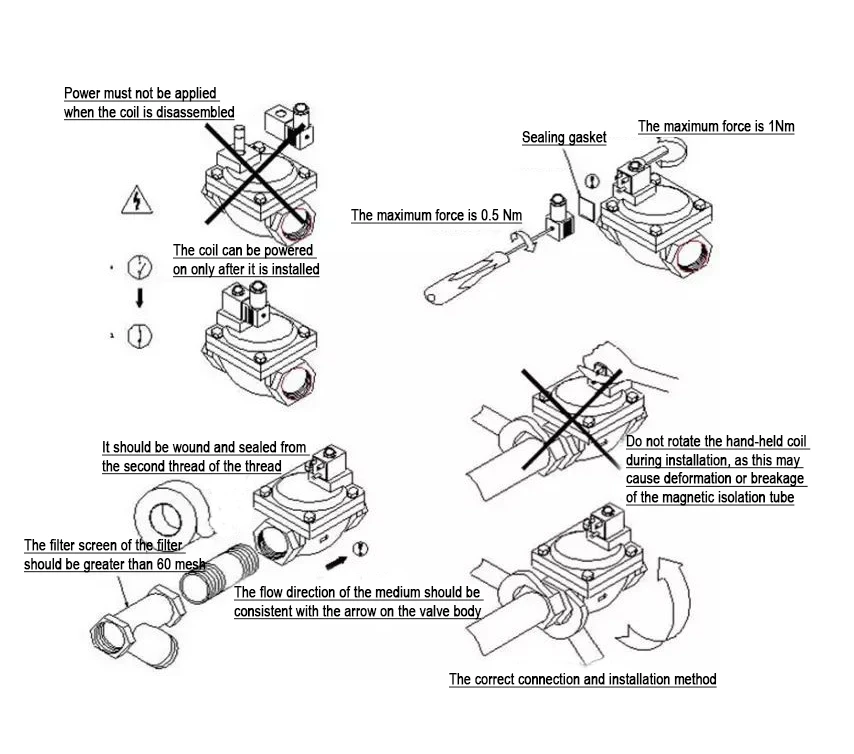
10. The solenoid valve should be installed on a horizontal pipeline (as shown in Figure 1). The coil should be installed vertically upwards and must not be installed vertically (as shown in Figure 2), otherwise it will cause leakage and affect the service life.
11. The installation position of the solenoid valve should reserve a certain operating space to facilitate daily maintenance and regular upkeep.
12. In cases where the rigidity of the pipeline is insufficient or there is a water hammer phenomenon, it is recommended to fix the pipes before and after the valve with brackets or other means to prevent vibration caused by the operation of the solenoid valve.
13. When used in freezing or extremely cold places, the pipes and valve bodies must be insulated with heat insulation materials, or heaters should be installed on the pipes.
14. After the solenoid valve is connected to the pipeline, it should be pressurized in the forward direction (do not pressurize in the reverse direction; otherwise, the solenoid valve will be damaged). Check whether there is any leakage at the solenoid valve and the connection pipe.
15. For solenoid valves equipped with standard junction boxes, the plastic junction box should be removed and opened. After removing the test power cord from the factory, connect the user's power cord to the terminal and secure it. However, for solenoid valves with wires or leads, the removal cannot be done. Directly connect the wires to the user's power cord.
16. The power control circuits and facilities related to the solenoid valve, such as relays, switches, and contactors, should be firmly connected without any looseness or vibration. The electrical circuit should be connected to the corresponding fuse for protection of the electrical circuit; otherwise, it will affect the normal operation of the solenoid valve or cause damage.
17. To facilitate normal maintenance or prevent the repair and replacement of solenoid valves in case of failure, and to ensure the normal operation of the system, it is recommended to adopt one of the following backup pipeline schemes:
18. After the solenoid valve is installed and the inspection and preparatory test procedures are completed, fluid must be introduced for a test run of 3 to 5 times. Only after confirming that everything is normal can it be put into formal use.
19. Note: If you inform us when ordering the solenoid valve that it is for liquid flow, but during the test, gas is introduced, and leakage occurs, or the leakage exceeds the standard, it is a normal phenomenon. This is because there is a difference in density and viscosity between gas and liquid. At this time, if you introduce liquid, there will be no leakage or exceeding the standard.
Above is how to install a Pneumatic Solenoid Valve. To learn more related information, visit https://www.joosungauto.com/.